Setting Port Forwarding on Indihome HG6145F Fiberhome Modem Easily. Port forwarding is an effective way to connect CCTV portals, websites and web applications so that they can be accessed from anywhere and anytime as long as they are connected to the internet.
With this feature, it makes it easier for you to monitor CCTV at home by accessing the Static IP Public / WAN IP so you can monitor and monitor CCTV and the web portal that you created.
Port forwarding itself is a LAN port transfer from the Local IP that you have set so that you can access it from outside using WAN IP / Static IP Public, usually the port that is diverted using port forwarding is port 80.
on this occasion you will learn to set port forwarding on the HG6145F indihome fiberhome modem easily, the steps needed are
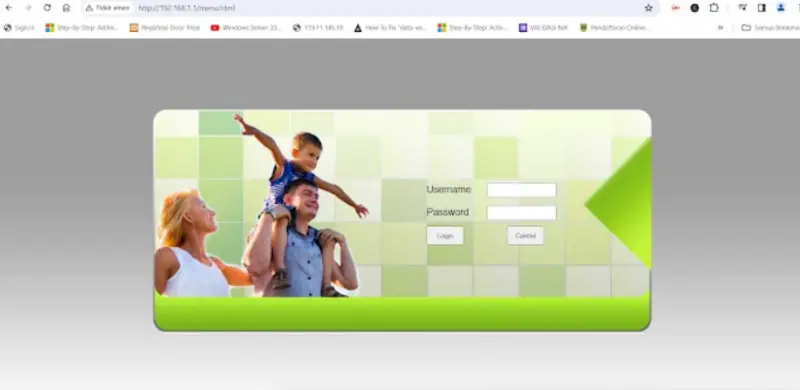
1. Please login to your indihome fiberhome modem to set port forwarding you need a super admin account, usually by default for the super admin user and password are as follows
Username : admin
Password : %0|F?H@f!berhO3e
Please login as a super admin user using the user account above.
2. After logging into the super admin dashboard page, please select the Application menu then click the port forwarding sub menu as shown below

3. The next step is to add port forwarding by clicking the Add button (see image below)

4. Next, please set the following
WAN: Select the default Network
Description: Fill in the name of the port forwarding that will be created, for example FWDPORT
Public Port: Fill in the public port as you wish, in this paper I use port 8000
IP : Please fill in the IP of the device that will be associated with the Public IP
Private Port: Fill in the port of the device that will be associated with IP Public (Default Port 80)
Protocol : Fill with TCP
Enable: Select Enable
For more details you can see the picture below

5. After completing the contents, click Apply and the port forwarding rule was successfully added as shown in the image below

To prove that the application can be accessed using a public ip, please check your public ip at https://whatismyipaddress.com/ then if you already know the public ip then please add the port behind the WAN IP Public that was previously set (Port 8000).
Read: How to Import Database with BigDump
Example: 36.69.111.222:8000
NOTE: you need to know that indihome itself uses DHCP Public IP so that the public IP will often change, to get a static Public IP you can contact indihome technicians or indihome customer service for more details.
until this stage you can make port forwarding easily.
NOTE: To delete the rule from the port forwarding that you created, please check the rule that was created then click the Delete button (as shown below)

Hopefully this tutorial can be useful for those of you who are looking to create port forwarding on indihome fiberhome modems easily. If you are still confused, I have prepared a video tutorial for creating port forwarding to make it easier for you to try it.
If this tutorial is useful, don’t hesitate to share it, please try and practice it because no one ever succeeds without trying.


