How to Migrate WordPress from Hosting to Other Hosting. Not sure how to move your website from one hosting to another? Check out this complete guide to WordPress migration! WordPress migration is the process of moving a WordPress-based website from one hosting to another. As complicated as it may seem, WordPress migration is actually quite easy.
WordPress migration can be done for many reasons. Not only because you want to try a new host with better features, but it can also be a solution to reduce your annual hosting costs.
With the increasing competition for hosting in the country, many hosting migration packages are now offered with massive discounts. Not bad, with the same specs we can reduce hosting costs by more than 50%.
So how do you migrate a WordPress website? Check out the 3 easy steps below!

3 Ways to Migrate a WordPress Website
1. Hosting Provider Assisted Migration
This is the easiest way to move your website from one hosting to another. So before migrating, you can ask your hosting provider about this.
Most hosting providers also provide free migration services for their users. This is a plus because there are also hosting providers that charge up to hundreds of thousands of rupiah to help with this migration process.
To do this, you’ll just be asked for your username and password to your old control panel so they can migrate your website to the new hosting. From my experience, this process is very quick and the website can be accessed as usual.
For those who don’t have a lot of time or don’t want to bother with the migration process, this method will be suitable for you.
2. How to Migrate a Website with the Help of Plugins
If you are not comfortable giving access to others and want to do it yourself, migrating with the help of a plugin can be your choice.
This way, all you have to do is click away. You can move your WordPress website from one hosting to another in no time.
It’s easy to do, whether you’re using a cloning plugin or a dedicated migration plugin. One of my recommended plugins is All-in-One Migration, which I used to move my WordPress website to localhost.
Read: 10 Steps to Fix a Sluggish Laptop to Be More Productive
To do so, please follow these steps:
- Install the All-in-One migration plugin on your original website.
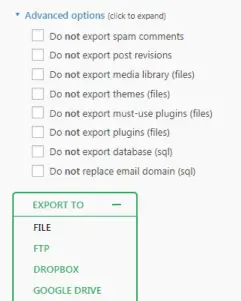
- Open the ALL-IN-ONE WP MIGRATION ► EXPORT menu. then select the EXPORT TO FILE option.
- If so, wait until the process is complete and then download the resulting backup file. The process of creating this backup file can take a long time depending on the size of the WordPress website we are moving.

- Once you’re done, install WordPress on your new hosting and install the All-in-One WP Migration plugin on the website.
- Before importing our old website to the new website, we must first increase the maximum upload limit of the destination website. One way to do this is by adding the following code to the htaccess file.
php_value upload_max_filesize 768MB
php_value post_max_size 800MB
php_value memory_limit 800MB
- f so, go to the ALL-IN-ONE WP MIGRATION ► IMPORT menu and select the file we downloaded earlier.
- As a final step, we just need to save the permalink. This can be done according to the instructions given by the All-in-One Migration plugin.
- Done. You can now access your destination website with the same username and password as your original website.
3. How to Migrate WordPress Manually
While both of these methods are pretty straightforward, there are times when they can be problematic, especially when the website you’re trying to migrate is very large.
While you can increase the upload limit, it can be tricky to upload three-thousandths of a WordPress file from your WordPress dashboard.
As a workaround, we can move WordPress manually. This involves moving your WordPress files and database, and then resetting wp-config.php to make your website accessible.
Read: How to Create a Free Blog on Blogspot (Quick and Easy!)
To move your WordPress website manually, follow these steps.
a. Backup WordPress Files and MySQL Database
To backup your WordPress files, we’ll use an FTP application like Filezilla. Once it’s installed on your computer, follow these steps:
- Connect FileZilla to your old hosting
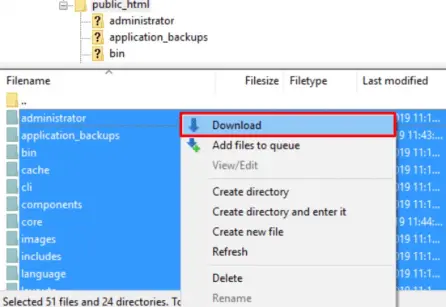
- Go to the WordPress installation folder (usually public_html) and copy all the existing files
- Right-click and select the DOWNLOAD option

To back up the MySQL database, we can use the phpMyAdmin feature in the hosting control panel. How to do this?
- Enter the hosting control panel (cPanel) then look for the PHPMYADMIN menu
- Select the database to be saved and then click the EXPORT button
- To export the entire database, select the QUICK method and select the SQL format.
- If so, click GO to save the database file on our computer

b. Upload WordPress Files and MySQL Database to New Hosting
To upload the WordPress files that we have downloaded, we will use the FTP Client FileZilla again, how?
- Extract the downloaded WordPress file
- Now connect FileZilla to the new hosting
- Enter the public_html folder in the REMOTE SITE column
- Find the file that will be uploaded from the LOCAL SITE column. Right-click the selected file and select the UPLOAD option.
To update MySQL, here’s how:
- Open the control panel and locate the MySQL DATABASES option.
- Create a new database and record the database name, username, and password.
- Select the database that has been created and then select the IMPORT tab menu at the top
- Click the CHOOSE FILE button, then select the backup database file that was previously created. If so, click the GO button
Read: How Arduino Uno Works and How its Principles and Role
c. Update the wp-config.php file
In order for the database file to connect with the WordPress installation file we copied, we must first change the contents of the wp-config.php file. How to do it
- Open the control panel or FTP and search for the public_html folder, then locate the wp-config.php file in that folder.
- Right-click and select the VIEW/EDIT option.
- Look for the following options and replace the values with our new database name. DB_NAME (database name), DB_USER (database username), DB_PASSWORD (database password), DB_HOST (database hostname, usually contains ‘localhost’)
- If so, save the changes. Done.
As you can see, there are many ways to migrate WordPress, from manual to plugin. If you don’t want to go through the hassle, you can even ask your hosting provider to migrate your website from your previous host.
Either way, hosting migration isn’t as complicated as it seems. If done correctly, it can be done quickly and without any problems.


